
Yamaha Blaster Engine Torque Specs
Correct torque is critical when assembling a Yamaha Blaster engine. Too little torque can allow fasteners to loosen, gaskets to leak and engine components to move. Too much torque can pull threads from the aluminum cases, distort sealing surfaces or break a fastener.
This Yamaha Blaster engine torque specifications guide covers the most important engine fasteners found on the 1988–2006 Yamaha YFS200 Blaster. Keep this page available whenever you are rebuilding a top end, replacing a clutch, splitting the crankcases or assembling a complete Blaster engine.
Working on a Yamaha Blaster? Join The Blaster Cult to compare setups, share your build, and get input from other Blaster owners. Join The Blaster Cult
Yamaha Blaster Engine Torque Specifications
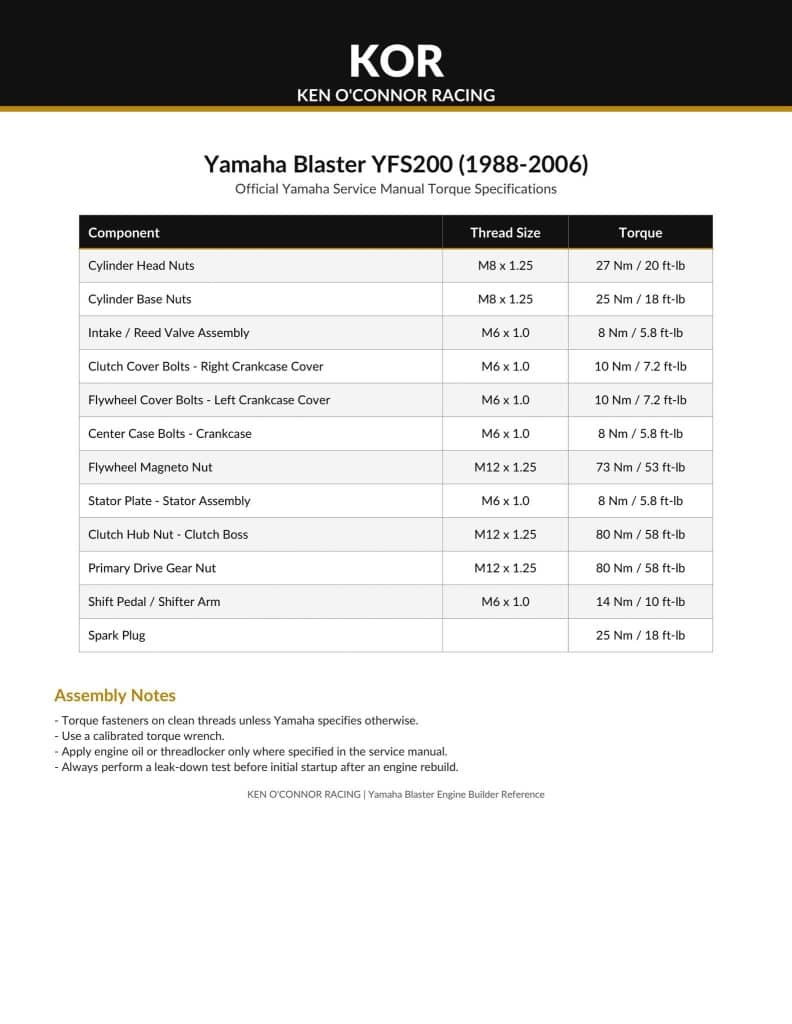
Important Torque-Wrench Tips
A torque specification is only useful when the fastener, threads and torque wrench are in good condition. Follow these basic practices before tightening any Yamaha Blaster engine fastener:
- Clean the male and female threads before assembly.
- Inspect studs, nuts, bolts and threaded holes for damage.
- Replace stretched, corroded or damaged hardware.
- Make sure blind threaded holes do not contain oil, water or debris.
- Use the correct torque-wrench range for the fastener.
- Tighten multiple fasteners gradually and evenly.
- Follow the proper crisscross pattern on the cylinder head and other sealing surfaces.
- Do not guess when converting between inch-pounds, foot-pounds and Newton-meters.
A large foot-pound torque wrench is not accurate enough for many of the smaller fasteners used in a Blaster engine. An inch-pound torque wrench is strongly recommended for crankcase bolts, clutch-cover bolts, flywheel-cover bolts and other smaller engine hardware.
Tightening the Yamaha Blaster Cylinder Head
The Yamaha Blaster cylinder-head nuts should be tightened gradually in a crisscross pattern. Start by seating every nut evenly, then work toward the final torque specification in several steps.
Tightening one nut completely before the others can place uneven pressure on the head and head gasket. This can contribute to sealing problems or distortion. Make sure the cylinder head, cylinder and gasket surfaces are clean and undamaged before assembly.
Never use silicone in place of the correct Yamaha Blaster head gasket or base gasket.
Yamaha Blaster Crankcase and Cover Bolts
The Yamaha Blaster uses aluminum crankcases and covers that can be damaged by excessive torque. Clutch-cover, flywheel-cover and crankcase bolts only require enough torque to compress the gasket or sealant and securely hold the parts together.
Before assembling the center cases, make sure the mating surfaces are completely clean and free from scratches, old sealant and gasket material. Confirm that the transmission, crankshaft, balance shaft and locating dowels are properly positioned before tightening the crankcase bolts.
Never use the crankcase bolts to force two case halves together. If the cases will not close with light, even pressure, something is incorrectly positioned.
Clutch, Flywheel and Primary-Gear Fasteners
The clutch-hub nut, flywheel nut and primary-drive gear fastener are subjected to engine vibration and rotating loads. These fasteners must be tightened to the correct specification and secured with the appropriate lock washer, locking tab or other factory-style locking method.
Holding the clutch or flywheel with the wrong tool can damage the clutch basket, crankshaft, flywheel or engine cases. Use the proper holding tool instead of wedging gears with screwdrivers, coins or other objects.
Recheck Your Work Before Starting the Engine
Before starting a freshly assembled Yamaha Blaster engine:
- Turn the engine over by hand.
- Confirm that the transmission shifts correctly.
- Check that the clutch operates properly.
- Verify that all lock washers and locking tabs are installed.
- Inspect the intake, base gasket, head gasket and crankcase areas.
- Perform an engine leak-down test.
- Recheck all external engine fasteners.
A two-stroke engine can suffer serious damage from an air leak, incorrect assembly or a loose internal fastener. Taking a few extra minutes to inspect your work is much less expensive than repairing another damaged engine.
Professional Yamaha Blaster Engine Building
Ken O’Connor Racing provides professional Yamaha Blaster engine rebuilding, cylinder boring, crankshaft rebuilding, cylinder porting, head rechambering, case trenching and other two-stroke machine-shop services.
All machine work and engine assembly are performed in-house. Whether you need one machining operation or a complete Yamaha Blaster engine rebuild, contact Ken O’Connor Racing for experienced service with no excuses—just results.
Yamaha Blaster Torque Specs FAQ
What years does this Yamaha Blaster torque chart cover?
This guide applies to the Yamaha YFS200 Blaster produced for the United States market from 1988 through 2006. Always confirm the specification when working with modified components or aftermarket hardware.
Can I use a foot-pound torque wrench on every Blaster engine bolt?
No. Many smaller Yamaha Blaster engine fasteners are better tightened with an inch-pound torque wrench. Using an oversized torque wrench increases the chance of inaccurate readings and damaged aluminum threads.
Should I use threadlocker on every engine bolt?
No. Threadlocker should only be used where it is specified or appropriate for the application. Adding lubricant, anti-seize or threadlocker can change the clamping force produced by a given torque reading.
Should I perform a leak-down test after rebuilding a Blaster engine?
Yes. Every two-stroke engine should be leak-down tested after assembly. A leak-down test can identify air leaks before they cause poor running, a lean condition or serious engine damage.